Mig welding is a great way to weld metal together, and it’s not as difficult as you might think. In fact, mig welding is one of the easiest types of welding to learn. If you’re thinking about getting into mig welding, there are a few things you need to know and have on hand before you can start.
Mig welding is a great way to join two pieces of metal together. It’s fast, efficient, and relatively easy to learn how to do. But before you can start welding, you need to have the right tools in place.
Here’s a quick rundown of what you’ll need:
– A welder: This is the most important tool, of course! You’ll need to choose a welder that’s rated for the thickness of metal you’ll be working with.
– Wire feeder: This attaches to your welder and feeds the wire into the weld joint.
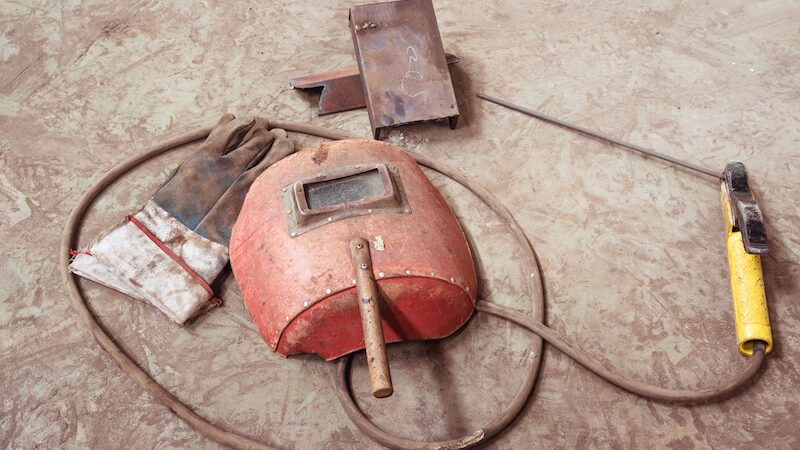
– Welding mask: This protects your eyes from the bright arc of the welding process.
– Gloves: These protect your hands from heat and sparks.
With these tools in hand, you’re ready to start mig welding!
Welding Tools And Equipment List
Welding is a fabrication or sculptural process that joins materials, usually metals or thermoplastics, by causing coalescence. This is often done by melting the workpieces and adding a filler material to form a pool of molten material (the weld pool) that cools to become a strong joint, with pressure sometimes used in conjunction with heat, or by itself, to produce the weld.
This process is most commonly used with metals.
The word “welder” refers to the operator rather than the machine. Welding, while an ancient technique, only became commercialized and developed into an industrial process in late 19th century Europe and North America during the Industrial Revolution. Prior to this time welding was largely limited to small-scale production and repair work.[1]
Today it plays a vital role in large-scale manufacturing processes.[2]
Different energy sources can be used for welding; most commonly arc welding uses either an electrode wire fed through contact tip or a rod which is connected to an electrode holder (stinger), TIG (GTAW) uses nonconsumable tungsten electrodes; MIG (GMAW) and FCAW use consumable wire electrodes; plasma cutting uses electrically charged gas.
[3][4][5]
Welding equipment includes helmets and goggles, gloves, aprons, long sleeved shirts made of natural fibers like cotton are recommended as they will not melt onto skin if caught on fire,[6] safety shoes,[7][8] earplugs or muffs,[9] respirators.[10][11] In addition machines used for welding such as power supplies, wire feeders,, torches,, guns also known as stinger torches are needed along with filler materials called consumables including rods,, wires ,and flux.
. Various chemicals are also needed for cleaning metal surfaces before welding them together as well as for post-weld cleanup.
Mig Welding Tools And Equipment
If you’re thinking about getting into mig welding, there are a few things you’ll need in order to get started. In this blog post, we’ll go over some of the essential mig welding tools and equipment that you’ll need to get the job done right.
First and foremost, you’ll need a good quality welder.
There are a variety of welders on the market, so it’s important to do your research and find one that suits your needs. You’ll also need a gas cylinder, an earth clamp, a wire brush, and safety gear like gloves and a mask.
Once you have all of your equipment, it’s time to start practicing!
There are a number of online tutorials and resources available to help you learn the basics of mig welding. With some practice, you’ll be able to produce high-quality welds in no time.
Power Tools Used in Welding
Welding is a process that joins materials, usually metals or thermoplastics, by using high heat to melt the parts together and cause them to fuse. Welding is often used in the manufacturing of cars, boats, aircrafts, and other large metal products. It can also be used to repair metal products that have been damaged.
There are many different types of welding, but most welders use one of two processes: arc welding or oxy-fuel welding. Arc welding uses an electric current to create a spark that melts the metals being joined together. Oxy-fuel welding uses a gas torch to heat up the metals until they melt.
Most welders use power tools to help them with their work. These tools include: -A welder: This is the machine that produces the heat needed for welding.
It may run on electricity, gas, or batteries. -An electrode holder: This holds the electrode (a metal rod) in place while you weld. -A ground clamp: This attaches the electrode holder andwelderto a ground (usually a water pipe).
This helps prevent electrical shocks while you weld. -Wire brush: Used to clean off rust or dirt fromthe metals you will be joining together before you start welding them.
What Do I Need to Start Mig Welding
Are you interested in learning how to weld? If so, then you may be wondering what equipment you need to get started. Mig welding is a type of welding that uses an arc between a wire electrode and the workpiece to create heat.
This heat melts the metals, which are then joined together.
Mig welding is a popular type of welding because it is relatively easy to learn and can be used on a variety of materials, including aluminum, stainless steel, and mild steel. If you’re thinking about getting into mig welding, here’s what you’ll need:
-A power source: this can be either an AC or DC power source. AC is typically used for lighter gauge materials while DC is better for thicker materials. You’ll also need to determine the amperage and voltage requirements for your project.
-Wire feeder: this device feeds the wire electrode into the torch at a constant speed. Wire feeders come in both portable and stationary models.
-Torch: the torch delivers gas (usually Argon) to protect the weld area from oxygen and other contaminants.
It also has a trigger that controls the wire feeder speed and starts/stops the flow of gas when necessary. Torches come in different sizes depending on the application – smaller torches are better for thinner materials while larger torches are better for thicker materials.
-Gas cylinder: this supplies gas (usually Argon) to the torch via hose connection.
Gas cylinders come in different sizes depending on how much gas they can hold – typically 20 cubic feet or 50 cubic feet sizes are most common. Be sure to choose a size that will accommodate your needs; otherwise, you’ll have to constantly stop welding to refill your tank! And last but not least…
Mig Welding Attachment
If you’re looking for a mig welding attachment that will make your welding projects easier, then you’ve come to the right place. In this blog post, we’ll provide detailed information about mig welding attachments and how they can benefit your projects.
Mig welding attachments are devices that attach to your mig welder in order to help with the alignment of your welds.
There are many different types of mig welding attachments available on the market, but they all serve the same purpose: to make your welds more precise and easier to control.
The most common type of mig welding attachment is the jig. Jigs help to keep your welds in a straight line, which is essential for achieving a strong and durable weld.
If you’re new to mig welding, or if you’re struggling to get neat and tidy results, then investing in a jig could be a great idea.
Another popular type of mig welding attachment is the guide sleeve. Guide sleeves help you to position your electrode correctly before starting each weld, which again leads to neater and more precise results.
If you’re serious about getting professional-looking welds, then investing in a guide sleeve is definitely worth considering.
No matter what type of mig welding project you’re working on, there’s sure to be a mig welding attachment that can help you achieve better results. So why not give them a try?
You might just be surprised at how much difference they can make!
Mig Welding Machine Parts And Function
Mig welding machines are a type of welding machine that uses an arc to create heat to weld metal together. There are three main parts to a mig welder: the power supply, the wire feeder, and the torch. The power supply provides electricity to the wire feeder and torch.
The wire feeder feeds welding wire into the torch. The torch is held by the welder and is used to direct the arc onto the metal being welded.
It provides electricity to both the wire feeder and torch. Without a power supply, a mig welder will not work. There are two types of power supplies: AC (alternating current) and DC (direct current).
AC power supplies are more common because they are less expensive than DC power supplies. However, AC power supplies can be more difficult to use because they can cause problems with arcing if not used properly. DC power supplies provide cleaner welds but are more expensive than ACpower supplies .
The wire feeder is another important part of a mig welder. It feeds welding wire into the torch so that it can be melted and used to weld metal together. Wire feeders come in two different types: automatic and semi-automatic .
Automatic wire feeders are less common because they are more expensive than semi-automatic ones . However, automaticwire feedersare easier to use because they automatically regulate how much welding wire is fed into the torch . Semi-automaticwire feeders requirethe operatorto manually regulate how much welding wire is fed into the torch .
The last main part of a mig welder isthe torch . Thetorchis held bythewelderandisusedto directthearconthemetalbeingweldedtogether .Torchescomeinmanydifferentshapesand sizes ,butthey all have threemainparts : themachineconnection ,thegas valve ,andtheliquid cooling system .Themachineconnectionisthepartofthetorchthat connects ittothemigweldingmachine .Thegas valve controls howmuch shielding gasis released fromthemigwelding machine intothe atmosphere aroundthearc .Andtheliquid coolingsystemkeepsthetorchcool during operationto prevent overheating .
Credit: makemoneywelding.com
What are the 4 Basic Components of a Mig Setup?
MIG welding, or Metal Inert Gas welding, is a type of arc welding that uses an electrode made of a consumable wire that’s fed through a nozzle held in place by a contact tip. The electrode is connected to a power source, which provides the electricity necessary to create an arc between the electrode and the workpiece. The workpiece is also connected to the power source, usually through a ground clamp.
A MIG welder typically has four main components:
1. A power supply – this provides the electricity necessary to create an arc. It can be either AC (alternating current) or DC (direct current).
2. An electrode – this is a consumable wire that’s fed through the nozzle. It’s made of metal, such as copper or aluminum, and it conducts electricity.
3. A gas tank – this stores the gas that’s used to shield the weld from oxygen and other contaminants in the air.
The most common gases used are argon and carbon dioxide.
4. A gun – this is what you hold in your hand while welding.
How Do You Set Up Mig Welding Equipment?
MIG welding, or Metal Inert Gas welding, is a popular type of welding that uses an electric arc to weld metal together. MIG welding is a great option for many projects because it is relatively easy to learn and can be used on a variety of metals. If you are thinking about giving MIG welding a try, you will need to have the proper equipment.
This includes a MIG welder, gas cylinder, wire feeder, and power supply. Here is a step-by-step guide on how to set up your MIG welding equipment:
1) Start by setting up your welder according to the manufacturer’s instructions.
This usually involves attaching the ground clamp to the workpiece and connecting the power cord to the welder.
2) Next, attach your gas cylinder to the welder using the appropriate regulator. Be sure that the valve on the gas cylinder is turned off before making any connections.
3) Once your gas cylinder is connected, you can turn on the valve and set the flow rate according to your needs.
4) The next step is to set up your wire feeder. Most wire feeders come with clear instructions on how to do this.
Basically, you will need to connect the wire feeder unit to both the power supply andthe welder itself.
5) Finally, select theappropriate settings on your welder for your project.
What Do You Set a Mig Welder At?
A MIG welder is an arc welding process that uses a continuously fed wire electrode and an Argon-based shielding gas. The machine sets the welder at a predetermined voltage and wire feed speed. The welder can then adjust the current by turning a knob on the machine.
The most common types of metals welded with a MIG welder are mild steel, aluminum, and stainless steel. Each metal has specific properties that require different welding settings. For example, aluminum requires lower currents and voltages than mild steel because it melts at a much lower temperature.
To set up your machine for MIG welding, start by selecting the proper gas. For most projects, argon or CO2 will work fine. If you’re welding aluminum, you’ll need 100% Argon gas.
Next, select the right wire diameter for your project – thicker wires are better for thicker metals while thinner wires work better with thin sheets of metal.
Now it’s time to set the voltage on your machine. This will be determined by the thickness of your material – refer to your owner’s manual or ask an expert at your local hardware store for help if you’re unsure what setting to use.
Generally speaking, thicker materials require higher voltages while thinner materials can be welded at lower voltages.
Finally, set your welder to the correct amperage or current output for your project. Again, this will be determined by the thickness of your material – refer to your owner’s manual or ask an expert at your local hardware store for help making this selection.
In general, thicker materials require higher amperage while thinner materials only need low amperage levels to fuse properly.
With those three factors set – gas type, voltage/amperage level, and wire diameter – you should be ready to start MIG welding!
What are the Five 5 Welding Essentials?
Welding is a process of joining two materials together by using heat and pressure. The welded joint is stronger than the base material and can be used to create various structures and products. Welding is a versatile process that can be used on a variety of materials, including metals, plastics, and glass.
There are five essential welding methods: oxy-fuel welding, plasma cutting, shielded metal arc welding, gas tungsten arc welding, and flux cored arc welding.
Oxy-fuel Welding: Oxy-fuel welding is one of the oldest and most commonly used welding processes. It uses a fuel gas (usually acetylene) and oxygen to generate heat that melts the base material.
The molten material then fuses together when cooled.
Plasma Cutting: Plasma cutting is a process that uses high-velocity plasma to cut through electrically conductive materials. The plasma is created by passing an electric current through a gas such as argon or nitrogen.
Shielded Metal Arc Welding: Shielded metal arc welding (SMAW) is a manual welding process that uses consumable electrode rods coated in flux to lay down weld beads on the base material.
5 Must-Have Metalworking And Welding Tools For Beginners // Quick Tips
Conclusion
If you’re interested in getting into welding, you might be wondering what kind of tools and equipment you need to get started. Mig welding is a type of welding that uses an electrode that is fed through a wire feeder to create an arc between the metal being welded and the electrode. This arc melts the metals, which are then joined together.
In order to set up for mig welding, you will need a few things: a power source, an earth ground, a wire feeder, and a mig torch. The power source can be either AC or DC. If you’re using AC, you’ll also need a rectifier.
An earth ground is necessary to complete the circuit and provide a path for the current to flow back to the power source.
The wire feeder feeds the electrode through the mig torch to the workpiece. The mig torch also has gas flowing through it (usually argon) which protects the molten pool of metal from oxidation.
When everything is set up correctly, all you need to do is pull the trigger on the mig torch and start welding!