Brake spring pliers are a special type of pliers that are used to remove and install the springs that are found on brake calipers. These springs can be very difficult to remove without the proper tools, and can be dangerous if not handled correctly. Brake spring pliers have a wide variety of uses, and can be found at most auto parts stores.
- Start by opening the jaws of the pliers wide enough to fit over the spring
- Place the tips of the jaws on either side of the spring, and squeeze the handles together to compress the spring
- Once the spring is compressed, release the handles and remove the pliers from the spring
Brake Pliers
Brake pliers are a vital part of any mechanic’s toolkit. They are used to adjust, repair and maintain brakes on all types of vehicles. There are many different types and sizes of brake pliers available, so it is important to choose the right ones for the job at hand.
The most common type of brake pliers is the C-clamp style. These have a large jaws that can grip onto both sides of a brake pad or shoe, making them ideal for adjusting or removing brake pads. Other popular types include pin-style brake pliers and needle-nose brake pliers.
Pin-style pliers have sharp pins on their jaws that can be used to pierce through tough brake materials, while needle-nose pliers have long, thin jaws that allow them to reach into tight spaces.
No matter what type of brake pliers you choose, make sure they are made from high-quality materials that can withstand repeated use. Also, look for models with comfortable handles that won’t slip out of your hands when you’re working on brakes.
Drum Brake Spring Tricks
Drum brakes are one of the oldest types of braking systems, and they’re still in use on many vehicles today. Though they’ve been around for a long time, there are still some secrets to be learned about these brakes. Here are some tips and tricks for getting the most out of your drum brakes:
1. Inspect your drums regularly. This is especially important if you live in an area with a lot of rain or snow. Make sure to check for any cracks, warping, or other damage.
2. Clean your drums regularly. brake dust can build up on the drums and cause them to wear prematurely. Use a clean cloth or brush to remove any brake dust that has accumulated.
3. Adjust your shoes as needed. Over time, the shoes in your drum brakes can become worn down or misaligned. This can reduce braking performance, so it’s important to adjust them as needed (usually every few thousand miles).
4 . Don’t forget about the springs! The springs in your drum brakes play an important role in keeping the shoes properly tensioned against the drums.
If they become damaged or broken, it can cause problems with braking performance.
Truck Brake Spring Pliers
If you’re like most people, you don’t think about your truck’s brakes until there’s a problem. But keeping your brakes in good working order is essential to the safety of you and your passengers, so it’s important to be proactive about brake maintenance. One simple way to do this is to check your truck’s brake springs on a regular basis.
Brake springs are an important part of the braking system, and they can wear out over time. If a brake spring breaks, it can cause serious problems with your brakes. That’s why it’s important to check them regularly and replace them if necessary.
The best way to check brake springs is with a pair of truck brake spring pliers. These pliers are designed specifically for checking truck brake springs, and they make the job quick and easy. Simply insert the tips of the pliers into the ends of the spring, and then squeeze the handles together.
If the spring is broken, you’ll feel it give way under pressure. If you don’t have a pair of truck brake spring pliers, you can still check your springs by hand. Just be careful not to put too much pressure on the springs, as they may break if handled too roughly.
Once you’ve checked all of your truck’s brake springs, take note of any that are broken or showing signs of wear.
Snap-On Brake Spring Pliers
If you’re looking for a quality pair of brake spring pliers, Snap-On is a great option. These pliers are designed to make it easier to remove and install brake springs, and they’re built to last with a durable construction. The jaws on these pliers are also serrated, so they’ll grip the spring firmly without slipping.
Brake Spring Removal Tool
If you’re a do-it-yourselfer, then you know that one of the most important maintenance tasks for your vehicle is changing your brakes. And, one of the most important tools in changing your brakes is the brake spring removal tool. This tool allows you to remove the springs that hold the brake pads in place so that you can change them out.
There are a few different types of brake spring removal tools on the market, but they all essentially work in the same way. You’ll need to position the tool over the top of the spring and then push down on it to release the tension. Once the tension is released, you can simply pull out the old brake pad and replace it with a new one.
Brake springs are under a lot of tension, so it’s important to use caution when removing them. Be sure to follow all instructions that come with your particular tool, and always wear gloves and eye protection when working with these kinds of tools.
Drum Brake Tool Kit
If you’re looking to do some work on your car’s drum brakes, you’ll need a good drum brake tool kit. This will give you all the tools you need to properly adjust, repair, and maintain your brakes. Here’s a look at what you can expect to find in a typical kit.
First, there will be a set of wrenches for adjusting the star wheel adjuster. You’ll also need a flathead screwdriver and possibly a Phillips head screwdriver as well. Next, there will be either a C-clamp or an adjustable wrench for compressing the springs.
Then, there are two different types of tools for removing the shoe retaining clips- either needle nose pliers or a small hook tool. After that, you’ll need something to clean the drums with- either brake cleaner or rubbing alcohol will do the trick. Finally, there is usually an instruction booklet included in the kit as well.
With all of these tools, you should have everything you need to work on your drum brakes. Be sure to follow the instructions carefully and take your time so that you can ensure proper braking performance when you’re finished.
Brake Spring Tool Heavy-Duty
If you’ve ever had to change your brake springs, you know it can be a real pain. The Brake Spring Tool Heavy-Duty from Lisle makes the job much easier. This tool is designed to compress large brake springs found on many heavy-duty vehicles.
It has a long reach and can be operated with one hand, so you can keep the other hand free to work on the brakes. The spring tool is made of high-quality steel for durability and has a comfortable handle for easy operation. changing your brake springs will be a breeze with this handy tool from Lisle.
Brake Spring Tool Autozone
If you’re looking for a brake spring tool, Autozone is a great place to start your search. They offer a wide selection of tools to choose from, and their prices are very competitive.
When it comes to brake springs, there are two main types: compression and tension.
Compression springs are used to compress the brake pads against the rotor, while tension springs help keep the pads in place.
No matter which type of spring you need, Autozone has the right tool for the job. Their selection includes both hand tools and power tools, so you can find the perfect one for your needs.
And if you’re not sure which tool is best for your car, their staff is always happy to help.
Credit: www.kingtony.com
How Do You Use a Brake Spring Washer Tool?
If you’re wondering how to use a brake spring washer tool, wonder no more! This handy tool is used to remove and install the retaining clip that holds the brake shoes in place on many vehicles. It’s a simple process: first, remove the cotter pin or other retainer that’s holding the brake shoe in place.
Next, slip the end of the tool over the top of the brake shoe and push down to release the clip. Then, simply pull the shoe off of its mount. To install, just reverse these steps – slip the new brake shoe onto its mount, then use the tool to snap the retaining clip into place.
That’s all there is to it!
How Do You Use the Over the Counter Brake Spring Tool?
If your car has disc brakes, the Over-the-Counter (OTC) brake spring tool can be used to safely remove and install the retaining clips that secure the brake pads to the caliper. This is a handy tool to have if you need to do any work on your brakes, such as changing the pads or servicing the calipers. Here’s how to use it:
First, make sure that the OTC tool is compatible with your car’s make and model. Then, locate the retaining clip on the back of the brake pad. The clip will be held in place by a small pin or screw.
Using the OTC tool, gently pry up on the retaining clip until it pops off. Take care not to damage the clip or pin. Once the clip is removed, you can pull out the old brake pad and replace it with a new one.
To install the new pad, simply line up the retaining clip and press it back into place.
How Do You Use a Brake Spring Installer?
A brake spring installer is a tool that helps you install or remove brake springs. It consists of a handle and a jaws that open and close to grip the spring.
To use the brake spring installer, first position the jaws around the spring.
Then, squeeze the handle to open the jaws and release it to close them around the spring. To remove the spring, simply reverse the process.
How Do You Put Springs Back on Drum Brakes?
If your car has drum brakes, you may eventually have to replace the springs. Over time, they can wear out or break. You’ll know it’s time to replace them when you hear a squeaking noise when you brake or if the brakes feel spongy.
Changing the springs on drum brakes is not a difficult task, but it does require some special tools. You’ll need a spring retainer tool and a brake spring tool, both of which can be found at most auto parts stores. You’ll also need a few other basic tools, like pliers, wrenches and screwdrivers.
The first step is to remove the wheel and tire so you can access the brakes. Once the wheel is off, you’ll see two large nuts on either side of the backing plate. These nuts hold on the shoes, which are what the pads press against to create friction and stop the car.
Use your wrench to remove these nuts and set them aside. Then pull off the shoes – there will be one at the top and one at the bottom. Now you should be able to see inside the backing plate where the springs are located.
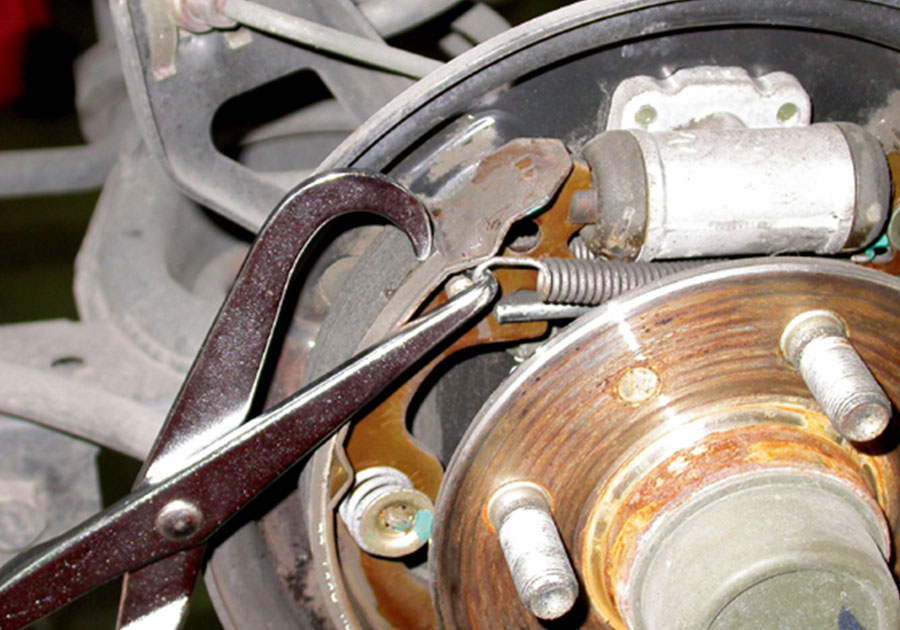
There are usually two springs – a larger outer spring and a smaller inner spring. The outer spring hooks onto an anchor pin on one side, while the inner spring hooks onto both shoes in order to keep them together. Use your brake spring tool to unhook both springs from their anchors.
Now you can install new springs by hooking them onto their respective anchors in reverse order – first hook onthe inner spring, thenthe outer spring .
Brake Pliers : How to use both sides
Conclusion
How to Use Brake Spring Pliers
Brake spring pliers are a necessity when it comes to working on brakes. They are used to remove and install the brake shoes and springs.
Here is a step by step guide on how to use them:
1. Firstly, you need to open up the jaws of the pliers so that they can fit around the brake shoe.
2. Once the jaws are in place, you need to squeeze the handles together which will release the tension on the brake shoe and allow you to remove it.
3. To install the new brake shoe, simply reverse the process – open up the jaws of the pliers and fit them around the new shoe before squeezing the handles together to secure it in place.