If your garden hoe is beginning to show signs of wear and tear, it’s important to take action to repair it. A well-maintained garden hoe can last for years, but if left untreated, it will eventually need to be replaced. With a few simple tools and some elbow grease, you can easily repair your garden hoe.
- Inspect the hoe for any damage
- If there are any cracks or chips in the blade, use a hammer and chisel to repair them
- If the handle is loose, tighten it with a wrench or screwdriver
- If the hoe is bent, use a vise and hammer to straighten it out
How to Replace a Garden Hoe Handle
If your garden hoe is in need of a new handle, it’s easy to replace it yourself. You’ll just need to purchase a new handle and then follow these simple steps:
1. Unscrew the old handle from the hoe head.
If it’s difficult to remove, you may need to use a wrench.
2. Screw on the new handle, making sure that it’s tight.
3. That’s it!
Your garden hoe is now good as new.
How to Make a Hoe Handle
If you’re looking for a project that will give you a chance to work with some wood and create something both useful and attractive, making a hoe handle is a great option. With just a few supplies and some basic woodworking skills, you can make a beautiful new handle for your hoe in no time.
Here’s what you’ll need to get started:
-A piece of hardwood (oak or maple would be good choices) that is long enough and wide enough to comfortably fit your hand. You’ll need about 18 inches of length and 2-3 inches of width.
-A saw (a handsaw or power saw will both work fine)
-Some sandpaper
-A drill with bits in sizes that match the screws you’ve chosen (more on that later)
-Screws (we recommend using deck screws as they are designed to withstand weathering without rusting) in lengths that will allow them to go through the wood but not all the way through the metal part of the hoe head.
For most hoes, 1 inch screws should be plenty long.
Fix Garden Rake
If your garden rake is looking a bit worse for wear, don’t despair! With a few simple steps, you can have it looking like new again.
First, start by giving the rake a good cleaning.
Remove any dirt, debris, or leaves that are stuck to the teeth. You can use a stiff brush or even a power washer to make quick work of this task.
Once the rake is clean, inspect it for any damage.
Look for bent or broken teeth, as well as any cracks in the handle. If you find any damage, it’s best to replace the affected parts so that your rake will be able to function properly again.
If everything looks good, then it’s time to sharpen the teeth.
This will help ensure that your rake can penetrate the ground easily and gather up all of the leaves and debris. You can use a file or sharpening stone to accomplish this task quickly and easily.
Once you’ve completed these steps, your garden rake should be looking and working like new again!
Lopper Handle Repair
If you have a broken lopper handle, don’t despair! With a little time and effort, you can easily repair it yourself. Here’s how:
First, remove the blade from the lopper. If the blade is held on with rivets, use a drill to remove them. If the blade is held on with bolts, unscrew them with a wrench.
Once the blade is removed, take a close look at the break in the handle. If it looks like it can be glued back together, do so using a strong adhesive. Let the glue dry completely before proceeding.
If the break in the handle is too severe to be glued back together, you’ll need to replace the entire handle. To do this, first measure the length of the old handle (from where it attaches to the blade to where it meets the end cap). Cut a new piece of wood or metal to this same length.
Replacing Rogue Hoe Handle
If your hoe handle is starting to show signs of wear, it’s time to replace it. Here’s how:
1. Start by removing the old handle.
Use a hammer or other tool to loosen the wedge that holds the handle in place, then pull the handle out.
2. Measure the length of the old handle so you know what size replacement to get.
3. Choose a new handle made from durable material like wood or metal.
Avoid plastic handles, which can break easily.
4. To install the new handle, first drive the wedge into place with a hammer. Then insert the new handle and tap it gently until it’s seated securely.
How to Replace a Garden Fork Handle
A garden fork is a gardening tool with four or five long, narrow tines. It is used for breaking up soil, aerating the soil, and turning over compost. Garden forks are also useful for lifting and transplanting plants.
The handle of a garden fork can break or become worn with use. When this happens, it is necessary to replace the handle.
To replace a garden fork handle, you will need:
-A new handle
-A hammer
-An adjustable wrench or pliers
-Screws (if needed)
-Wood glue (optional)
Follow these steps:
1. Unscrew the old handle from the metal shaft of the fork using an adjustable wrench or pliers. If the handle is held on by screws, remove them as well.
2. Insert the new handle into the metal shaft of the fork.
If it is a tight fit, you may need to tap it in with a hammer.
3a. For wooden handles: Screw the new handle onto the metal shaft of the fork using screws that are slightly longer than those that held on the old handle.
Be sure to screw them in tightly so that they don’t come loose over time. You can also use wood glue to secure the connection between the new handle and metal shaft (allow ample time for drying).
3b For plastic handles: Use pliers to squeeze together any rivets that are holding on the old plastic handle (if present).
Garden Tool Handles
Garden Tool Handles
Most garden tools have a handle to help you grip and hold onto the tool while you use it. The type of handle can vary depending on the tool.
For example, a shovel or spade typically has a D-shaped handle, while a hoe usually has an L-shaped handle. Some handles are made of wood, while others are made of metal or plastic.
The size and shape of the handle is important for both comfort and safety.
A comfortable handle will make it easier to use the tool for extended periods of time, while a safe handle will help prevent accidents. When choosing a garden tool, be sure to consider both the comfort and safety of the handle.
How to Replace a Spade Handle
If the handle of your spade is broken, don’t despair! It is a relatively easy fix that anyone can do with just a few tools. Here’s how to replace a spade handle:
1. Remove the old handle. This will involve removing any nails or screws that are holding it in place. If the handle is held on with rivets, you’ll need to drill them out.
2. Cut a new piece of wood to the same length as the old handle using a saw. Make sure that the new piece of wood is strong and sturdy – it needs to be able to support your weight when you’re digging!
3. Drill holes in the new piece of wood for the nails or screws that will hold it in place.
If you’re using rivets, make sure that these holes are slightly larger than the diameter of the rivet.
4. Attach the new handle to the spade using nails, screws, or rivets (depending on what was holding on the old handle). Be sure that everything is nice and tight so that your new handle won’t come loose while you’re using it!
5. Give your newly-attached spade handle a good test by digging into some dirt – it should feel strong and sturdy under your weight. If everything seems good, put away your tools and get back to gardening!
Credit: www.gardenstew.com
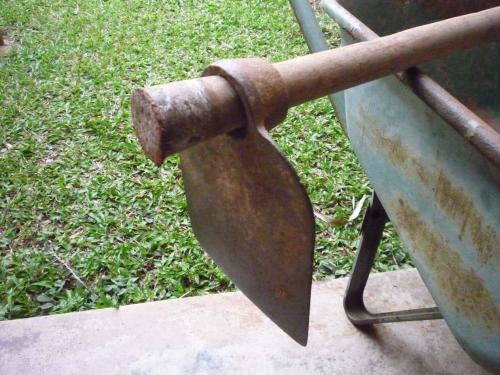
How Do You Fix a Hoe Head Handle?
If your hoe head handle is broken, you will need to replace it. You can buy a new hoe head and handle at most hardware stores. To replace the hoe head handle, first remove the old handle by unscrewing it from the hoe head.
Next, insert the new handle into the hole in the hoe head and screw it in place. Be sure to screw the handle in tightly so that it doesn’t come loose while you’re using it.
How Do You Attach a Hoe Head?
Assuming you would like instructions on how to attach a hoe head:
First, find the hoe head that you would like to attach. Next, locate the handle of the hoe.
The handle should have a hole or an opening at one end. Take the hoe head and line up the holes or openings of each. Once they are lined up, insert a pin, nail, or screw through both holes or openings in order to secure them together.
Make sure that the connection is tight and secure before using your new hoe!
How Do You Assemble a Hoe?
Assuming you would like tips on how to assemble a hoe:
If you purchase a hoe that is not yet assembled, follow these steps to put it together. First, identify all the parts of the hoe.
You should have a blade, two handles, and any screws or fasteners that came with it. Next, use the screws or fasteners to attach the blade securely to one of the handles. Make sure that the blade is facing the right direction before you start screwing it in place.
Once the blade is attached, do the same with the other handle. Be careful not to overtighten the screws or fasteners, as this can damage the wood or metal. Finally, test out your new hoe by using it to weed your garden beds!
How Do You Put a Handle on a Garden Tool?
If you’re looking to put a handle on a garden tool, the first thing you’ll need to do is identify the type of tool you have. There are a few different types of garden tools, each with their own unique handles. Here’s a quick rundown:
Shovels – Shovels typically have D-shaped handles that fit comfortably in your hand. To attach the handle, simply insert it into the shovel head and secure it with screws or bolts.
Rakes – Rakes usually have T-shaped handles that can be made from wood or metal.
To attach the handle, simply insert it into the rake head and secure it with screws or bolts.
Hoes – Hoes typically have long, straight handles that are made from wood or metal. To attach the handle, simply insert it into the hoe head and secure it with screws or bolts.
Once you’ve identified the type of tool you have, attaching the handle is a relatively simple process. Just follow the steps above and you’ll be ready to get to work in no time!
*EASY* Garden HOE HANDLE Repair
Conclusion
It’s easy to take garden hoes for granted. After all, they’re just simple tools designed to help us dig and weed our gardens, right? But what happens when your trusty hoe starts to show signs of wear and tear?
If you’re like most gardeners, you probably don’t have a lot of experience repairing tools, so it can be tough to know where to start.
Not to worry! This helpful guide will walk you through the process of repairing a garden hoe, step by step.
First, you’ll need to gather some supplies: a hammer, screwdriver, file, and wire brush. Once you have your tools ready, follow these steps:
1. Inspect the damage on your hoe.
Is the blade bent or chipped? Are there any cracks in the handle? Identifying the problem areas will help you know which parts need to be fixed.
2. Use the hammer and screwdriver to remove any nails or screws that are holding the blade in place. If the blade is badly damaged, you may need to replace it entirely.
3. Use the file or wire brush to clean off any rust that has built up on the metal parts of your hoe.
Pay special attention to the area where the blade meets the handle – this is a common spot for rusting since it’s often exposed to moisture while gardening.
4a. If your hoe just has minor damage (such as a few nicks in the blade), then simply use the file or wire brushto smooth out these imperfections until they’re barely noticeable .
Reattachthe blade using nails or screws , being careful not totighten them too much so thatthe blade can still move slightly . Thiswill help prevent further damagefrom happening too easily .
4b. However , if there is more significant damage ( suchas a large crack in the handle ), thenyou’ll need toreplacethe broken piece with a new one . You can find replacement handles at most hardware stores . Just make sureto get one that fits snugly ontoyour existing shaftfor proper stability .
5 . Once everything is repairedand reattached , give your newly fixed gardenhoea quick test runto make sureit’s working properly beforeyou put it back into actionin your garden !