If you’re looking to add a light bar to your vehicle without drilling, there are a few different methods you can use. The first is to purchase a light bar that comes with its own mounting brackets. These brackets will usually have suction cups or some other type of adhesive that will allow you to attach the light bar to your vehicle’s body without having to drill any holes.
Another option is to use universal mounting brackets. These brackets can be attached using screws, bolts, or even zip ties. Once you have the bracket in place, simply slide the light bar into the bracket and secure it using the provided hardware.
- Choose a location for the light bar
- Clean the area where the light bar will be mounted with alcohol to remove any dirt or debris
- Peel off the backing on the adhesive pads and attach them to the light bar
- Press the light bar into place on the vehicle’s roof, hood, or bumper
- Allow the adhesive to cure for 24 hours before driving the vehicle
Where to Run Wires for Roof Light Bar
If you’re looking to add a roof light bar to your vehicle, there are a few things you need to take into consideration before drilling any holes. First, you’ll need to decide where on the roof you want to mount the light bar. Second, you’ll need to figure out how you’re going to route the wiring from the light bar up to the roof.
And third, you’ll need to determine what size and type of hole saw you’ll need to drill through your vehicle’s roof.
We’ve put together a quick guide on where to run wires for your roof light bar so that you can get started on your project as soon as possible!
1. Mounting Location: You’ll first need to decide where on the roof you want to mount your light bar.
Keep in mind that most light bars are designed for use with vehicles that have a metal or fiberglass roofs. If your vehicle has a plastic or cloth top, it’s important that you consult with a professional before proceeding with installation. Once you’ve chosen a location, use masking tape or painters tape measure out and mark where each end of the light bar will be mounted.
It’s important that the mounts are level so that your light bar is level when installed.
2. Wire Routing: The next step is routing the wires from thelightbar up tot heroof . There are a few different ways that this can be done depending onthe configuration ofyourvehicleandthelocationof themounts .
One option isto routethe wiresthrough an existing opening such as avent , sunroof ,or doorjam . Another optionisto makethe necessary cuts anddrillholesin order tore-routeexistingwiring throughthe newmount locations . Whichever methodyouchoose ,it ‘simportantthatyou take care nottodamageanyexistingwiringwhen makingcuts or drilledholes .3 .
Hole Saw Size & Type: Now it’s time for drilling! In order togetthe correct sizeandtype of hole sawforyour project ,youshouldfirstconsultwitha professionalor refer toyourvehicle ‘sowner manual 。 The wrongsizedhole sawnotonlycan damageyourvehiclebutitcan also be dangerous .
No Drill Light Bar Mount Ram 1500
If you’re looking for a way to add a light bar to your Ram 1500 without drilling, then this no drill light bar mount is the perfect solution. This mount attaches to the existing roof rack of your truck and provides a secure and sturdy platform for mounting a light bar. It’s quick and easy to install, and it doesn’t require any permanent modifications to your truck.
Plus, it’s backed by a lifetime warranty. So if you’re looking for an easy way to add some extra light to your Ram 1500, this no drill light bar mount is the way to go.
Light Bar Windshield Mount
In most cases, a light bar windshield mount is the best way to go when you’re looking to add auxiliary lighting to your vehicle. There are a few reasons for this: first, it’s the most secure way to mount a light bar since it uses existing holes in the windshield frame. Second, it keeps the light bar closer to the glass, which means that there’s less chance of wind noise and vibration.
And third, it provides a more streamlined look since there aren’t any exposed brackets or clamps.
There are a few things to keep in mind when choosing a light bar windshield mount. First, make sure that the mount is compatible with your specific make and model of vehicle.
Second, take into account how you want to wire your new lights – some mounts come with pre-wired harnesses, while others require you to do the wiring yourself. And finally, think about what size and style of light bar you want before making your purchase. With so many options on the market today, it’s easy to find a mount that meets all of your needs!
No Drill Light Bar Mount Silverado
If you’re looking for a way to add a light bar to your Silverado without having to drill any holes, then this No Drill Light Bar Mount is the perfect solution! This mount attaches to the existing factory roof rack crossbars, so it’s quick and easy to install. Plus, it’s made from high-quality materials that are built to last.
So if you’re looking for an easy way to add some extra light to your truck, then this is the way to go!
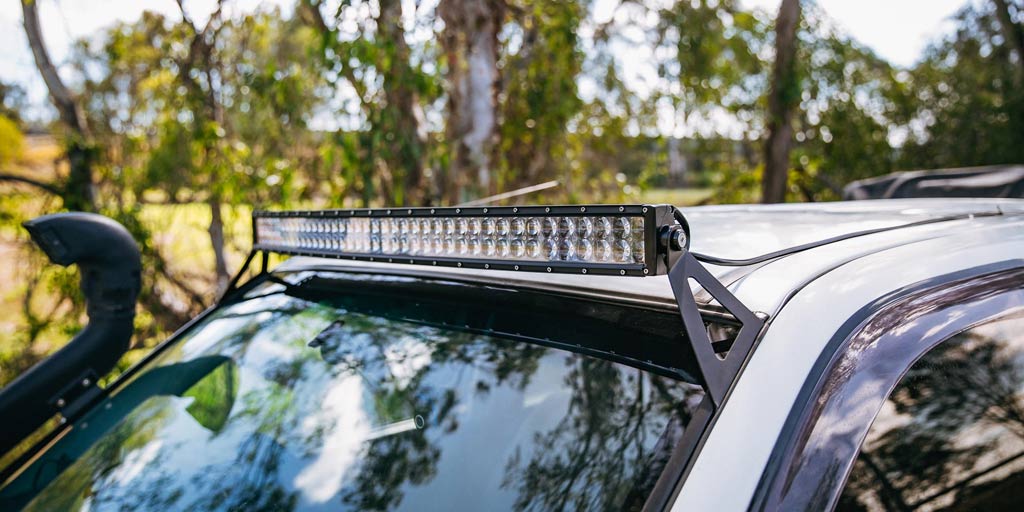
Mounting Light Bar above Windshield
Most vehicles come with a factory-installed light bar above the windshield, but there are many aftermarket options available as well. If you’re looking to add a light bar to your vehicle, it’s important to choose the right location for mounting. The ideal spot for a light bar is above the windshield, where it won’t obstruct your view or get in the way of other equipment on your vehicle.
When choosing a location for mounting your light bar, keep in mind that it should be securely mounted so that it doesn’t become a hazard while you’re driving. It’s also important to consider how the light bar will affect your visibility when it’s turned on. If you have any doubts about where to mount your light bar, consult with an expert before making any final decisions.
No Drill Light Bar Mount F150
If you want to add a light bar to your F150 but don’t want to drill any holes, check out this no-drill light bar mount. This mount attaches to the frame of your truck using existing holes, so there’s no need to drill any new ones. It’s a quick and easy way to get the light bar you want without damaging your truck.
Magnetic Light Bar Mount
If you are looking for a magnetic light bar mount, there are a few things you need to know. First, you need to make sure that the mount is compatible with your specific light bar. Most mounts are made to fit a certain size or type of light bar, so it is important to check compatibility before making your purchase.
Second, you need to decide where on your vehicle you want to mount the light bar. The most popular locations are on the roof or in the front grille, but you can also find mounts that attach to the bumper or side mirrors. Once you have found a compatible mount and decided on a location, it’s time to install!
Most magnetic light bar mounts come with all necessary hardware and instructions for installation. If not, it is relatively easy to find online tutorials or videos that can walk you through the process step-by-step. In general, installing a magnetic light bar mount is not difficult and can be done in about an hour or less.
Once installed, your new magnetic light bar mount will allow you to quickly and easily attach your light bar whenever you need it. No more fumbling around with straps or nuts and bolts – simply hold the lightbar in place against the magnet and it will securely attach itself. When it’s time to remove thelightbar , simply lift straight up and away from the magnet; no tools required!
Drilling Holes in Roof for Light Bar
If you’re looking to install a light bar on your roof, there are a few things you need to take into consideration. First, you need to make sure that the area where you’ll be drilling is clear of any obstacles. Second, it’s important to mark the center of the hole with a pencil or marker so you know where to drill.
Finally, when drilling the hole, be careful not to damage the shingles or other materials around the hole.
Once you have all of that taken care of, it’s time to start drilling! Begin by using a small drill bit to create a pilot hole in the center of your mark.
Then, switch to a larger drill bit and continue drilling until the hole is big enough for your light bar mount. With the holes drilled, simply screw in the mount and then attach your light bar. That’s all there is to it!
Credit: www.brightlighthub.com
Can You Mount a Light Bar Without Drilling?
Technically, you can mount a light bar without drilling by using adhesive mounts or brackets that clamp onto the surface. However, we do not recommend this method as it significantly decreases the stability and lifespan of the light bar. If you are going to mount a light bar, we recommend drilling into the surface for a more secure hold.
How Do You Mount a Light Bar?
One of the most popular questions we get asked here at Rigid Industries is “How do I mount my light bar?”. While there are many ways to do so, we have compiled a few different methods that will give you a solid foundation on which to start your installation.
We typically recommend starting by finding a suitable location for the light bar.This will vary depending on the application and vehicle, but generally speaking you want to avoid any high-pressure areas like behind the grill or in front of the radiator. You also want to make sure that the light bar won’t interfere with any moving parts on your vehicle, like the hood or windshield wipers. Once you have found a good location, you can begin mounting the light bar itself.
Most likely you will be using some kind of bracketry system to do this; however, some people opt for a more permanent solution and weld or bolt the light bar directly to their vehicles. If you go this route make sure that you take into account thermal expansion and contraction when choosing your mounting points, as metal can warp under extreme heat conditions. Finally, once your light bar is mounted securely in place, all that’s left to do is wire it up!
This part can be a little tricky if you’re not familiar with electrical work, but fortunately there are plenty of resources available online (including our own wiring diagrams) to help guide you through the process. And once everything is hooked up correctly, simply flip the switch and enjoy increased visibility day or night!
Where is the Best Place to Mount a Light Bar?
There are a few things to consider when mounting a light bar. First, you’ll want to make sure the light bar is securely mounted so it doesn’t come loose while driving. Second, you’ll want to consider the angle of the light bar.
You don’t want the light bar pointing too high or too low, as this can create blind spots. The best place to mount a light bar is on the front bumper, near the center of the vehicle. This provides optimal lighting and won’t obscure your vision.
How Do You Install a Light Bar on a Truck Roof?
Installing a light bar on your truck’s roof is a relatively easy process that can be completed in a few minutes with just a few tools. The first step is to determine where you want to mount the light bar and then use a drill to create holes for the mounting brackets. Once the holes are drilled, you’ll need to insert the bracket bolts and tighten them down.
Next, you’ll attach the light bar itself to the brackets using the provided hardware. Finally, you’ll need to wire up the light bar by running wires from the battery through the firewall and to the light bar itself.
NO DRILL, NO CUT, NO WELD! (LED Light Bar Mount)
Conclusion
If you’re looking to add a light bar to your vehicle but don’t want to drill into your bumper, there are a few different methods you can use to mount it. One option is to use adhesive strips or magnets to attach the light bar. You can also purchase a mounting bracket that will allow you to bolt the light bar onto your vehicle without drilling.
Whichever method you choose, be sure to follow the instructions carefully so you can properly and safely install your new light bar.