Gardening is a great way to get outside and enjoy the fresh air. One of the most important aspects of gardening is making sure your plants are in rows. This helps them get the proper amount of sunlight and prevents overcrowding.
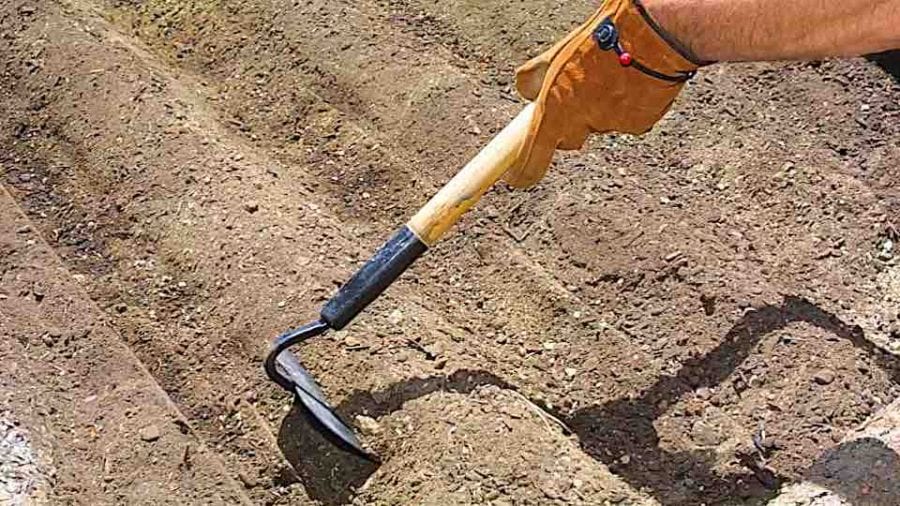
Making rows with a hoe is a quick and easy way to ensure your garden is neat and tidy.
- First, you need to clear the area where you want to make your row
- You can do this with a hoe by scraping away any weeds or grass in the way
- Once the area is clear, use the hoe to make a furrow in the soil
- This furrow should be about as wide as you want your row to be, and it should be dug down to a depth of around 6 inches
- To make sure that your row is straight, use a stringline or some other means of keeping it level as you work along
- As you move down the length of the furrow, stop every so often to check that it is still straight
- When you reach the end of the furrow, simply turn around and start hoeing back towards where you started from
- The second pass with the hoe will help to loosen up any clumps of soil and give your row a nice, finished look
How to Make Rows in a Garden by Hand
The first step is to mark out your garden area. You can do this by driving stakes into the ground at the corners of your garden, and then stringing a line between them. Once you have your garden area marked out, it’s time to start digging!
For a small garden, you can probably dig all of the rows by hand. If you have a larger garden, you may want to use a rototiller to help with the digging. Either way, make sure that each row is about 1-2 feet wide, and that there is enough space between rows for you to walk comfortably.
As you dig your rows, be sure to remove any rocks or roots that you come across. These can interfere with the growth of your plants later on. Once all of your rows are dug, it’s time to start planting!
How to Make Rows in Garden With Tractor
In order to make rows in your garden with a tractor, you will need to use a rotary hoe. This tool is attached to the back of the tractor and will help you create perfect rows in your garden.
To attach the rotary hoe, first back the tractor up to where you want to start making yourrows.
Then, lower the pto lever and engage the blades. You may need to adjustthe depth of the blades depending on how deep you want yourrows to be.
Thehoe will create nice, clean rows that are perfect for planting. Just be sure toget out of the way when it’s time to turn around so you don’t get hit by therevolving blades!
Garden Row Maker
Garden row makers are an essential tool for anyone who wants to have a neat and tidy garden. They help you create evenly spaced rows, which makes it easy to plant seeds or small plants. Garden row makers come in different sizes, so you can choose one that is suitable for your garden.
There are also different types of garden row makers, such as manual or electric. If you want to save time, an electric garden row maker is a good choice.
How to Make Garden Rows With a Tiller
If you’re looking to start a garden, one of the first things you’ll need to do is create some rows. This can be done with a tiller, and it’s actually not that difficult. Here’s a step-by-step guide on how to make garden rows with a tiller.
1. First, mark out where you want your rows to be. You can do this with string or stakes and string. Once you have your lines marked, it’s time to start tilling.
2. Start at one end of the area you’re going to till and work your way down, making sure to overlap each pass by about 6 inches. Keep the tiller at a consistent depth as you go – about 6 inches is ideal for most gardens.
3. As you finish each row, use a hoe or rake to smooth it out so that it’s level and ready for planting.
That’s all there is to it! With just a little bit of effort, you can easily create perfect garden rows that are ready for planting.
How to Make a Garden Row Maker
Are you looking for an easy way to make evenly spaced rows in your garden? If so, then you need a garden row maker! A garden row maker is a simple tool that can save you a lot of time and effort when planting your garden.
Here’s how to use one:
1. First, select a straight, level spot in your garden where you want to plant your rows.
2. Next, measure the width of your garden row maker and mark out the appropriate distance with stakes or string.
This will be the length of your first row.
3. Place your garden row maker at one end of the marked area and push it forward until the other end is reached. Use a ruler or tape measure to ensure that the distance between the wheels is equal to the width of your tool.
4. Now, simply lift up the handles on either side of the wheelbase and move it over to start the next row! Repeat this process until all of your desired rows have been created.
Garden Row Tool
Garden Row Tool
Looking for an easy way to keep your garden rows looking neat and tidy? A garden row tool is the perfect solution!
Simply attach the tool to your tractor or lawn mower, and it will automatically create a perfectly straight line as you drive down the length of your garden. No more guessing where to start each new row – the garden row tool takes all the guesswork out of it!
Whether you have a large garden or just a few raised beds, a garden row tool can save you time and hassle.
It’s also great for creating lines for planting boundaries, mulching paths, or anything else you can think of. Best of all, there are no batteries or power cords required – simply attach it to your vehicle and go!
If you’re looking for a simple way to make gardening easier, a garden row tool is the way to go.
Check out our selection today and find the perfect one for your needs.
Garden Rows Or Mounds
When it comes to gardening, there are two main ways that people grow their plants – in rows or in mounds. Each method has its own benefits and drawbacks, so it’s important to choose the right one for your garden. Here’s a closer look at the pros and cons of each:
Rows:
Pros:
-Rows make it easy to keep track of your plants and know exactly where each one is located.
This can be helpful when you’re trying to identify problems or harvest your crops.
-Weeding is often easier in rows since you can simply walk down the middle of the row and pull any weeds that you see.
Cons:
-Rows can be more susceptible to soil erosion since water tends to run off in straight lines. This can be remedied by adding mulch or using other methods to slow down water flow.
Credit: grownbyyou.com
What is the Easiest Way to Make Rows in a Garden?
There are a few different ways that you can make rows in a garden, but some methods may be easier than others. One way to make rows is by using a hoe or spade to create furrows in the soil. You can also use a rototiller to make evenly spaced rows in the soil.
Another option is to lay down strips of cardboard or landscape fabric and then cover them with soil. This will help to prevent weeds from growing and will also make it easier to keep your rows straight.
What Garden Tool Makes Rows?
A hoe is a garden tool that is used to make rows in the soil. It has a long handle and a flat, rectangular blade. The blade is usually made of metal or plastic.
How Do You Make a Garden Row With a Shovel?
When it comes to making garden rows, using a shovel is by far the best option. Not only is it more efficient, but it also allows for more precision. Here’s a step-by-step guide on how to make a garden row with a shovel:
1. First, mark out where you want your garden row to be. This can be done by simply using a stick or string as a guide.
2. Once you’ve marked out the area, start digging a trench that’s about 6 inches deep and 12 inches wide.
3. As you dig, make sure to loosen up the soil so that it’s easier to work with later on.
4. Once the trench is dug, remove any rocks or debris that may be in the way.
5. Now it’s time to start leveling off the bottom of the trench using your shovel.
Just keep working back and forth until the entire bottom is level.
What is the Best Way to Orient Garden Rows?
There are a few things to consider when orienting garden rows. The first is the amount of sun that your garden gets. If you have a lot of shade, you’ll want to orient your rows north to south so that each plant gets an equal amount of sunlight.
If you have full sun, you can orient your rows any way you want.
Another thing to consider is the type of plants you’re growing. Some plants do better when they’re planted in east-west rows (such as corn), while others do better in north-south rows (such as tomatoes).
So it’s important to know which way is best for the plants you’re growing.
Finally, think about convenience. It’s often easier to walk up and down garden rows than it is to walk across them, so orientation can be a matter of personal preference.
Ultimately, the best way to orient your garden rows is the way that works best for YOU and YOUR garden.
MAKE PERFECTLY STRAIGHT GARDEN ROWS!
Conclusion
If you’re looking to make neat, evenly-spaced rows in your garden, a hoe is the tool for the job. First, mark out where you want your rows to be with string or garden stakes. Then, use your hoe to create a shallow furrow along the line – this will be where your seeds or seedlings go.
To make sure the furrows are of even depth, hold the hoe at a consistent angle as you work. Once you’ve made all your furrows, give them a good watering and then you’re ready to plant!