If you’re new to gardening, hoeing garden rows may seem like a daunting task. But it’s really not that difficult – once you know the basics. Here’s a quick guide on how to hoe garden rows, so you can get started on your gardening journey today.
The first step is to find a good hoe. There are many different types of hoes available, so do some research to find the best one for your needs. Once you have a hoe, it’s time to get started on your garden rows.
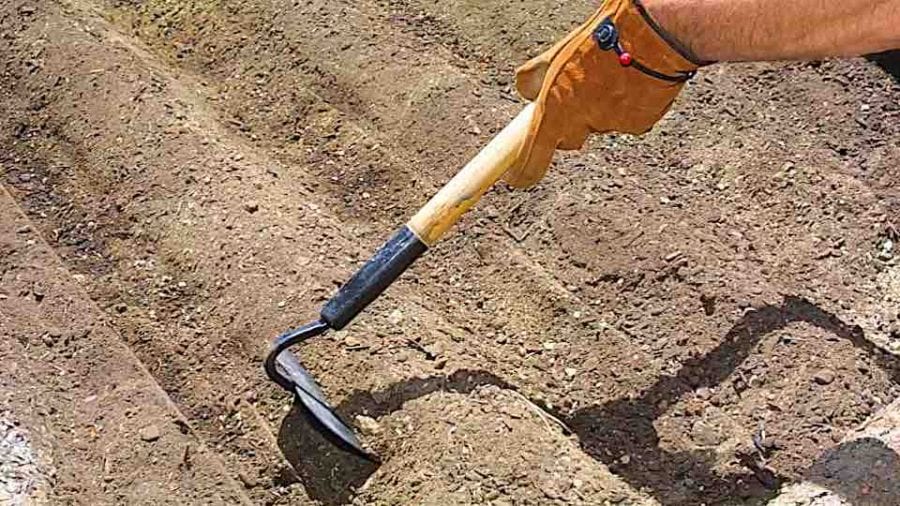
Start by loosening the soil with the hoe blade. You don’t need to go too deep – just enough to loosen the top layer of soil. Next, use the hoe to create furrows in the soil.
These furrows will act as channels for water and nutrients when you plant your seeds or seedlings.
Finally, use the hoe to smooth out the surface of the soil. Make sure all of your furrows are evenly spaced and at least two inches deep.
Once you’re finished, your garden row is ready for planting!
- Decide how wide you want your garden rows to be
- For example, if you plan to use a rototiller, it should be no wider than the width of the tiller
- Using a hoe, dig a furrow the length of your garden plot
- The depth of the furrow will depend on what you are planting
- If you are planting seeds, make sure the furrow is shallow enough so that when you cover them with soil, the seedlings will not be too deep underground
- Once you have hoed the entire length of your garden plot, turn around and hoe back down the row in the opposite direction, making sure to keep the same depth as before
- Repeat this process until all of your rows are complete
How to Make Rows in a Garden by Hand
When it comes to making rows in a garden by hand, there are a few different ways that you can go about doing so. The first way is to simply use a hoe or spade to create the furrows that you need. This method works well if you have a small garden, but can be quite time-consuming if you have a larger one.
Another option is to use a rototiller. This will make quick work of creating furrows, and is also great for larger gardens. However, it can be difficult to maneuver a rototiller in tight spaces, so keep that in mind when choosing this method.
Finally, you could also use an old-fashioned plow. If you have access to one, this can be a great way to make furrows quickly and easily. Just remember that plowing requires quite a bit of strength, so it may not be the best option if you’re not feeling up to the task.
Whichever method you choose, just make sure that your furrows are deep enough for whatever plants you’ll be putting in them. And then get ready for some serious planting!
Garden Row Maker
Garden row makers are a great tool for creating perfectly straight rows in your garden. They can be used to mark out the edges of your planting area, and then you simply line up the garden row maker with the marks and press it into the ground. The spikes on the bottom of the garden row maker will create a perfect furrow for planting seeds or transplants.
If you want perfectly straight rows in your garden, a garden row maker is an essential tool. You can use it to mark out the edges of your planting area, and then line it up with the marks and press it into the ground. The spikes on the bottom of the garden row maker will create a perfect furrow for planting seeds or transplants.
Garden Rows Or Mounds
When planning your garden, you may wonder whether to plant in rows or mounds. Both have advantages and disadvantages, so it’s important to understand the pros and cons of each before making a decision.
Rows are the traditional way of planting gardens.
They’re easy to create and maintain, and they allow plants to be spaced evenly apart for optimal growth. However, rows can be difficult to weed, and they can get very hot in summer if they’re not properly mulched.
Mounds are an alternative to rows that offer some benefits.
Mounds help improve drainage in the garden, which is especially helpful in areas that tend to be wet. They also make it easier to reach plants for harvesting since there’s no need to stoop down between rows. On the downside, mounds can be more difficult to establish than rows, and they may not look as neat and tidy as a well-planned row garden.
Ultimately, the best way to decide whether rows or mounds are right for your garden is to experiment and see what works best for you. There’s no right or wrong answer – it’s all about what will work best in your particular space and situation.
How to Make Rows in Garden With Tractor
Making rows in your garden with a tractor is a great way to get the job done quickly and easily. Here are some tips on how to make rows in your garden with a tractor:
1. Start by plowing your garden area.
This will help loosen up the soil and make it easier to work with.
2. Next, use a rototiller to till the soil. This will further loosen up the soil and help you create evenly-sized rows.
3. Once you have tilled the soil, use a measuring tape or ruler to mark out where you want your rows to be. Make sure to leave enough space between each row for you to be able to work comfortably.
4. Use a hoe or other tool to create furrows in the soil that are the same width as your row markers.
You can make these furrows as deep or shallow as you like, depending on how deep you want your plants’ roots to grow.
5. Now it’s time to plant! Place your plants in the furrows, making sure they are spaced evenly apart (again, depending on how big they will eventually grow).
How to Make Garden Rows With a Tiller
Garden rows are a great way to keep your plants organized and make the most of your gardening space. But if you don’t have a lot of experience with gardening, you might not know how to make garden rows with a tiller. Don’t worry – it’s actually pretty easy!
Just follow these simple steps:
1. Start by finding a straight line to use as your guide. You can use a string or rope to help you out with this step.
2. Next, position your tiller at one end of the line.
3. Begin moving the tiller forward, keeping it close to the ground as you go.
4. As you move along, the tiller will create a furrow in the soil – this is where your garden row will be!
5. Once you reach the end of the line, simply turn around and head back in the other direction until you’ve created a garden row that’s as long as you need it to be.
Garden Row Tool
If you’re a serious gardener, then you know that having the right tools is essential to keeping your plants healthy and your garden looking great. One tool that every gardener should have is a garden row tool.
A garden row tool is basically a long, thin piece of metal or plastic that you use to create rows in your garden.
It’s very easy to use – simply press the tool into the ground and pull it along to create a perfectly straight line. This is much easier than trying to make rows with a hoe or other gardening tool.
Once you’ve made your rows, you can then plant your seeds or seedlings in them.
This makes it much easier to keep track of where everything is growing, and also helps to ensure that your plants get the proper amount of sunlight and water.
So if you’re serious about gardening, be sure to pick up a garden row tool – it will make your life much easier!
Diy Garden Row Maker
Looking to start a garden, but don’t have a lot of space? A garden row maker is a great way to get started! With a little bit of planning and some basic materials, you can easily build your own garden row maker.
Here’s what you’ll need:
-4 boards (1″x6″x8′)
-2 boards (1″x4″x8′)
-1 board (2″x4″x8′)
-nails or screws
-saw
-hammer or drill with screwdriver attachment
Start by cutting the 4 1″x6″ boards into 4′ lengths. These will be the sides of your garden row maker.
Next, cut the 2 1″x4″ boards into 4′ lengths. These will be used for the ends of your garden row maker. Finally, cut the 2’x4′ board in half so that you have two 4′ long pieces.
These will be used for the cross supports in your garden row maker.
Credit: grownbyyou.com
What is the Best Way to Orient Garden Rows?
If you’re looking to start a garden, one of the first decisions you’ll need to make is how to orient your rows. There are a few different ways you can go about this, and the best option for you will depend on a few factors. Let’s take a look at a few of the most popular options so you can decide which is best for your garden.
One popular way to orient garden rows is in a north-south direction. This has the advantage of allowing all plants to receive an equal amount of sunlight throughout the day, as the sun moves from east to west. This is especially beneficial if you’re growing sun-loving plants that need as much light as possible.
Another advantage of this orientation is that it can help prevent tall plants from shading shorter ones.
Another option for orienting garden rows is in an east-west direction. This has the advantage of giving all plants equal exposure to morning and afternoon sun, which can be beneficial for some plant species.
It also allows you to take full advantage of any prevailing winds in your area, which can help keep your plants healthy by providing good air circulation. One potential downside of this orientation is that taller plants may cast shadows on shorter ones during part of the day.
Finally, another option worth considering is using raised beds instead of traditional row gardening.
Raised beds have many benefits, including improved drainage and aeration, better soil quality, and easier weed control. They also allow you more flexibility in terms of orientation since they’re not restricted by long rows running in one direction or another. You can arrange raised beds however you like depending on your needs and preferences.
So, what’s the best way to orient garden rows? The answer depends on what type of plants you’re growing and what conditions are like in your specific location. Ultimately, it’s up to you to experiment and see what works best in your own garden!
What Tool Do You Use to Make Rows in a Garden?
A garden row is a line of soil that has been tilled and is ready to be planted. Making straight rows in a garden can be done with a number of different tools, including a hoe, rake, or even string and stakes.
The most important thing to keep in mind when making rows is to make sure they are all the same width.
This will ensure that your plants have enough space to grow without crowding each other out. Once you’ve decided on the width of your rows, use whatever tool you’re comfortable with to create them.
If you’re using a hoe, start at one end of the garden and push the hoe through the soil, making sure to go deep enough that the blade turns over a good amount of dirt.
Continue along the length of the garden, making sure to keep the hoe at an even depth as you go. You may need to make several passes with the hoe to get all the way through the soil if it’s particularly hard or compacted.
A rake can also be used to create rows, though it may take more passes than with a hoe since rakes are not as wide.
Start at one end of the garden and pull the rake towards you, keeping it level with the ground as you go. Again, make sure to go deep enough that some soil is turned over with each pass. You may need to make several passes with the rake before moving on to planting.
If you don’t have any gardening tools available, or if you simply prefer not to use them, you can also makerows by marking out lines in the dirt with sticks or stones placed evenly apart. Then use a shovel or trowelto dig along these lines until your desired depth is reached.
How Do You Make a Garden Row With a Shovel?
To make a garden row with a shovel, you will need to first prepare the area where you want to plant. You will need to remove any weeds or grass that is in the way. Once the area is clear, you will need to loosen the soil with your shovel.
You can do this by making a back and forth motion with your shovel. Once the soil is loose, you will need to create a mound in the center of the row. This mound should be about 6 inches high.
To create this mound, you will need to scoop up soil from both sides of the row and place it in the center. Next, you will take your shovel and make a furrow down the center of the mound. This furrow should be about 4 inches deep.
Once the furrow is made, you can start planting your seeds or plants.
Garden Rows Without A String Or Hoe
Conclusion
If you’re looking to hoe garden rows, there are a few things you’ll need to keep in mind. First, make sure you have a sharp hoe. A dull hoe will just make the job harder and take longer.
Second, start at one end of the row and work your way down. You’ll want to make sure you’re using even strokes so that the whole row is evenly hoed. And finally, be careful not to damage any plants as you hoe.
With these tips in mind, hoeing garden rows will be a breeze!