If you have a garden hoe that is not working properly, there are a few things you can do to fix it. First, check the blade to see if it is dull or damaged. If the blade is dull, you can sharpen it with a file or sharpening stone.
If the blade is damaged, you will need to replace it. Second, check the handle to see if it is loose or broken. If the handle is loose, tighten the screws or bolts that hold it in place.
If the handle is broken, you will need to replace it. Finally, check the ferrule (the metal band that joins the blade and handle) to see if it is loose or damaged. If the ferrule is loose, tighten the screws or bolts that hold it in place.
- Clean the hoe with a wire brush to remove any dirt or debris
- Inspect the hoe for any cracks or damage
- If there are any cracks or damage, use a hammer and chisel to repair them
- Sharpen the blade of the hoe with a file or sharpening stone
How to Replace a Garden Hoe Handle
If your garden hoe handle is old and worn, it’s time to replace it. Here’s how:
1. Start by measuring the old handle.
You’ll need to know the length and diameter in order to purchase a replacement that will fit properly.
2. Once you have the measurements, head to your local hardware store or home improvement center and purchase a new handle that is the same size as the old one.
3. To install the new handle, first remove the old one by unscrewing it from the hoe head.
If the screw is rusted, you may need to use a pair of pliers to loosen it.
4. Once the old handle is removed, simply screw on the new one in its place. Be sure to tighten it securely so that it doesn’t come loose while you’re using it.
5. That’s it! Your garden hoe should now have a brand new handle that is ready for action.
How to Make a Hoe Handle
A hoe is a gardening tool that is used to dig, weed, and aerate soil. It has a long handle that is attached to a metal blade. The blade is usually made of steel or iron.
The first step in making a hoe handle is to select the type of wood you will use. The best type of wood for this project is hardwood such as oak or maple. You will need a piece of wood that is 1-2 inches thick and at least 2 feet long.
Once you have your piece of wood, use a saw to cut it into two pieces. One piece should be 18 inches long and the other should be 24 inches long. These will be the top and bottom parts of your hoe handle respectively.
Next, take the 18 inch piece of wood and drill a hole through the center of it using a drill bit that is slightly smaller than the diameter of your metal hoe blade. This hole needs to be big enough so that the blade can slide through it easily but not so big that there is too much play once the blade is inserted.
Now it’s time to attach the two pieces of wood together.
First, insert the metal hoe blade into the hole you drilled in the top part of the handle (the 18 inch piece). Then, place the bottom part of the handle (the 24 inch piece) underneath so that both holes line up perfectly with each other. Finally, screw or bolt them together using hardware that is appropriate for outdoor use such as galvanized screws or stainless steel bolts .
washers .and nuts .
Fix Garden Rake
A rake is an essential tool for any gardener, and garden rakes come in a variety of sizes and styles to suit different needs. If you’re looking for a new rake or need to replace an old one, it’s important to choose the right type of rake for your gardening tasks.
Garden rakes are typically made from either wood or metal, and both materials have their own advantages and disadvantages.Metal rakes are more durable than wood rakes, but they’re also heavier and can be more difficult to use. Wood rakes are lighter weight and often easier to maneuver, but they’re not as durable as metal rakes. When choosing a garden rake, it’s important to consider what type of material will best suit your needs.
If you have a small garden, a lightweight wood rake may be all you need. For larger gardens or tougher landscaping jobs, a heavier-duty metal rake may be necessary. Once you’ve selected the right material for your garden rake, it’s time to choose the right size.
Garden rakes come in both handheld and wheeled models, and the type you choose will depend on the size of your garden and the types of tasks you’ll be performing. Handheld rakes are great for smaller gardens or tight spaces, while wheeled rakes are better suited for larger areas. No matter what type of gardening task you need to perform, there’s a garden rake that’s perfect for the job.
With so many different types and sizes available, it’s easy to find the perfect match for your needs.
Replacing Rogue Hoe Handle
If your hoe handle is beginning to show signs of wear, it’s probably time to replace it. Here’s a quick guide on how to do just that:
1. Start by removing the old hoe handle from the head.
This can be done by loosening the bolt that holds it in place.
2. Once the old handle is removed, clean off any dirt or debris from the hoe head.
3. Next, measure the length of the new hoe handle you’ll need.
It’s important to get one that’s exactly the right size, so make sure you measure carefully!
4. With the new handle in hand, thread it through the hole in the hoe head and then secure it with the bolt. Be sure to tighten this well so that your new handle doesn’t come loose while you’re using it.
5. And that’s it!
Lopper Handle Repair
If your lopper handle has become loose or damaged, you can easily repair it with a few simple tools. First, remove the blade from the handle. Next, use a hammer and nail to drive out the old rivet from the handle.
Once the old rivet is removed, insert a new one in its place and secure it with a hammer. Finally, reattach the blade to the handle and you’re done!
Garden Tool Handles
Garden tool handles come in all shapes and sizes, but there are a few things that they all have in common. First, they are designed to be comfortable to hold, so they have ergonomic shapes that fit well in your hand. Second, they are made of durable materials like wood or metal, so they can withstand the elements and the wear and tear of gardening.
And finally, they all have some kind of grip or coating to help you keep a firm hold on them while you’re working.
There are a variety of different types of garden tool handles available on the market, so it’s important to choose the right one for your needs. If you’re looking for a handle that’s comfortable to hold and easy to grip, then foam or rubber handles are a good option.
For something more durable, try wooden or metal handles. And if you need a handle that’s easy to clean, then plastic or stainless steel might be the best choice.
No matter what type of garden tool handle you choose, make sure it’s the right size for your hands.
You don’t want something too big or too small – just something that feels comfortable when you’re using it. With the right handle in hand, gardening will be a breeze!
How to Replace a Garden Fork Handle
A garden fork is a gardening tool with four or five tines. It is used for digging, aerating, and turning over soil. The handle of a garden fork can break, especially if the fork is dropped on it.
If this happens, the broken handle must be replaced before the garden fork can be used again.
To replace a garden fork handle, you will need:
-A new garden fork handle
-A hammer
-A screwdriver
-Plyers
1) Unscrew the old handle from the metal part of thefork using a screwdriver. You may need to use plyers to loosen the screws first.
2) Insert the new handle into the metal part ofthe fork.
Make sure that it is inserted all the way in so thatthe screws will catch onto something solid when you try toscrew it back in place.
3) Use a hammer to gently tap on top ofthe new handle until it is flush withthe metal part ofthefork .
4) Screwinplace usinga screwdrivertightly .5) Yournewhandle shouldnow be secureand readyto useturnover some dirt!
How to Replace a Spade Handle
If the handle of your spade is broken or damaged, don’t despair! You can easily replace it with a new one. Here’s what you need to do:
1. Remove the old handle from the spade head. This may require a bit of force, so be careful not to damage the head.
2. Once the old handle is removed, clean up any dirt or debris from the inside of the spade head.
3. Take your new handle and insert it into the spade head. Make sure that it’s seated properly and secure it in place with a few nails or screws (depending on what type of handle you’re using).
4. That’s it!
Your new handle is now in place and ready for use.
Credit: www.gardenstew.com
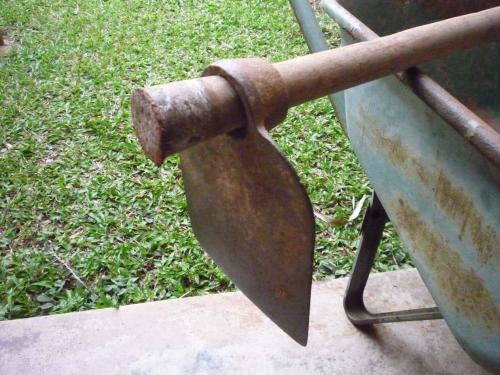
How Do You Attach a Hoe Head?
Assuming you would like instructions on how to attach a hoe head:
There are many types of hoes, and each type has a slightly different way of attaching the head. For example, some hoes have a metal ring that needs to be pried open in order to slide the head on, while others may have screws that need to be loosened or tightened in order to attach or detach the head.
However, there are a few general steps that are common among most hoe heads.
First, make sure the hoe handle is clean and dry. If it is dirty or wet, the head may not adhere properly or could slip off more easily.
Next, line up the holes on the hoe head with the bolts on the handle. Once they are aligned, insert the bolts and tighten them securely with a wrench. You may need to use two wrenches – one to hold the bolt in place while you tighten or loosen it with another wrench.
Tighten the bolts until they are snug but do not over-tighten them as this could strip the threads or damage the bolt. And that’s it! Your hoe should now be ready for use.
How Do You Fix a Hoe Handle?
If your hoe handle is broken, you can replace it with a new one. To do this, first remove the old handle by unscrewing the metal ferrule that holds it in place. Once the old handle is removed, measure the length of the hoe blade to determine how long the new handle should be.
Cut the new handle to size, then drill a hole through the center of it. Next, slide the new handle onto the hoe blade and screw on the metal ferrule to secure it in place. Finally, sand down any rough edges on the new handle and apply a coat of varnish or paint if desired.
How Do You Assemble a Hoe?
Assuming you would like a blog post discussing the steps of assembling a hoe:
“How to Assemble a Hoe”
If you’re anything like me, springtime is when you start feeling the itch to get out into the garden and get your hands dirty.
One of the first tools you’ll need for gardening is a hoe. But if you’ve never purchased one before, it can be tricky to know how to choose the right hoe and how to put it together. In this blog post, I’m going to walk you through everything you need to know about assembling a hoe.
When choosing a hoe, there are three main things you need to consider: the size of the blade, the weight of the tool, and the material of the blade. The size of the blade will determine how much area you can cover with each stroke while gardening. If you have a smaller garden, then a smaller blade will suffice.
However, if you have a larger garden or plan on doing some serious weeding, then you’ll want to opt for a larger blade. The weight of the tool is also important because it will affect how easy it is for you to use. If your hoe is too heavy, then it will be difficult to lift and maneuver; too light and it may feel flimsy and like it’s not getting any real work done.
Choose something that feels comfortable for you to hold and use. Lastly, pay attention to what material your hoe’s blade is made out of. Stainless steel or carbon steel blades are durable options that will last longer than those made from other materials such as aluminum or plastic.
With these factors in mind, select the perfect hoe for your needs!
Now that you have your new hoe, it’s time to assemble it! Depending on which model you chose, assembly instructions may vary slightly but generally follow these steps:
1) Start by insertingthe handle into hole at top off head
2) Use boltsto secure handle in place
3) That’sit!
How Do You Remove a Broken Handle from a Hoe?
It’s not uncommon to break a handle on your hoe – especially if you’re using it a lot or if it’s made of lower quality materials. If this happens, don’t despair – there are ways to remove the broken handle and replace it with a new one.
The first thing you’ll need to do is remove the head of the hoe from the shaft.
This can usually be done by unscrewing it (if it’s screwed on) or prying it off (if it’s held on with nails or rivets). Once the head is off, you’ll be able to access the broken handle.
If there are any nails or rivets holding the broken handle in place, use a hammer or pliers to remove them.
Once they’re out, you should be able to pull the broken handle out easily. If the handle is stuck, you may need to use a saw or other tool to cut it free.
Now that the old handle is out, you can install your new one.
Start by inserting the end of the new handle into the hole where the old one came out. If necessary, tap it in with a hammer until it’s snug. Then, screw on or nail/rivet on the head of the hoe until it’s secure.
Congrats – your hoe is as good as new!
*EASY* Garden HOE HANDLE Repair
Conclusion
If you have a garden hoe that is in need of repair, there are a few things you can do to fix it. First, check the hoe for any damage to the blade. If the blade is damaged, you will need to replace it.
Next, check the handle of the hoe. If the handle is broken or cracked, you will need to replace it. Finally, inspect the head of the hoe.
If the head is loose or missing, you will need to replace it.